Business Services

Signs That You Need Water Heater Repair

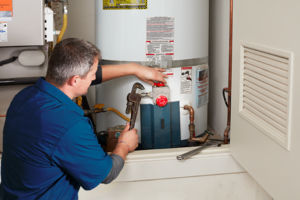
If you have a gas water heater, reignite the pilot light. You may need to replace a thermocouple or the gas control valve.

Noises like rumbling and popping could mean the tank is leaking. You can prevent this by draining your water heater once a year. Contact Water Heater Repair Spring TX now!

Water heaters are prone to failure for a variety of reasons. If you’re experiencing problems such as no hot water, a rusty or discolored pilot light, or a strange smell, these can signal that it’s time to call a professional for Water Heater Repair. The good news is that many of these problems can be prevented with regular maintenance.

For example, if you’re experiencing no hot water, it could be because your thermostat is set too low. Typically, the factory temperature setting is 120 degrees Fahrenheit, which may be too cold for your home’s needs. Changing the thermostat setting can fix this problem quickly.

If you have a gas water heater, the lack of hot water might also be caused by a faulty heating element or a pilot light that won’t stay lit. If this is the case, you can relight the pilot light. However, you should only do this if you follow the safety instructions from your heater.

A failed thermocouple or a faulty gas control valve can also cause a lack of hot water. If these are the cause, you should contact a plumber for Water Heater Repair as soon as possible to avoid a dangerous gas leak.

If your water heater is over ten years old, replacing it is a good idea. This is because they only have an average lifespan of about ten years, and replacing one might be cheaper in the long run than continuously repairing it. Moreover, an older water heater is less energy efficient and can cause significant electricity bills. Installing a newer model will save much money in the long run.

Occasionally, water heaters emit odors that are not pleasant. When these smells occur, it is often a sign that a problem exists. You likely have sulfate bacteria in your tank if you notice a foul, sulfur, or rotten egg odor. This happens because magnesium anode rods are corroding and leave sulfate residue in your water. These anode rods are designed to protect your water heater from rust but need replacement when they are degraded.

The odor of burning wires may also indicate an electrical problem with your water heater. This happens when loose wiring contacts each other and generates heat. If you detect this odor, it is important to contact a professional for water heater repair services immediately.

Water that smells like sewer or sewage indicates an issue with the gas line or a leak in your water heater. This is a dangerous problem and requires immediate attention from an experienced plumber.

If you have a gas leak, turn off your water heater and shut off the gas at the main valve. Open windows and doors to ventilate the area, then call a professional for immediate help. You can attempt to prevent a gas leak from your water heater by removing the temperature and pressure relief valve and anode rod and applying a hydrogen peroxide solution to the tank’s interior. This will eliminate the bacteria that are causing the odor and prevent it from returning in the future. However, it is best to call a plumber immediately with this issue, as the chemicals can be toxic and dangerous to your family. Our professionals have experience working with all types of water heaters so that they can diagnose and fix the problem quickly and safely.

If you are a homeowner and your water is rusty or discolored, it is usually due to your plumbing lines. Many homes have old galvanized steel piping, which corrodes on the inside over time. The corroded particles collect in the water line, making it look rusty or discolored when running a faucet. This is usually only a nuisance and poses no health risks. However, if the problem persists, it may be a sign that you must re-pipe your house.

When the discoloration only occurs in your hot water supply, the water heater is the most likely culprit. As the water heater tank ages, mineral sediment deposits on the bottom of the tank and causes discoloration in your hot water. Flushing the water heater regularly can help prevent this.

Water can also appear discolored when it travels through your pipes at high velocities, stirring up sediment collected in the mains. Water main breaks, fire fighting activities, or a large amount of system maintenance activity can cause this. The discolored water should resolve quickly once the pipes are flushed.

To troubleshoot discolored water, check to see if the water is rusty or yellow. Also, note when the discoloration happens and where it occurs. If only the hot water is rusted or brown, it could be your water heater or galvanized pipes. If the discoloration is in hot and cold water, it may be a problem with your home’s filtration system. In this case, you should call a plumber to inspect and fix the issue. If the discoloration occurs in all faucets, including toilets, it likely indicates a problem with your local water system and should be reported to your water company.

You may not realize it until your water heater suddenly stops working as well as it once did, but a slowdown can signal an issue that needs to be addressed. Depending on the issue, your water heater repair shop can help you restore its performance.

If your hot water turns cold quickly, mineral sediment buildup is possible inside the tank. The cold water entering your water heater carries some dissolved minerals and trace amounts of other debris like sand. Over time, this settles to the bottom of the tank, preventing it from heating the water effectively. This problem can often be resolved with a professional water heater flush and tune-up.

The sudden onset of cold water temperatures could also indicate a broken thermocouple or faulty heating system. The thermostat could be malfunctioning, or there may be corrosion on the heating elements that has caused them to fail. Either way, ignoring these issues will lead to excessive energy bills and a potential safety risk for your family.

A slower-than-normal water heater may also indicate that your unit isn’t getting enough combustion air. Without adequate air, the unit will have trouble producing a high-quality flame, which can negatively impact its efficiency and expose your family to carbon monoxide poisoning or contamination.

You should also be wary if you notice rust-colored water or an unpleasant odor from your tap. These are both signs that your water heater tank is leaking. Corrosion can cause significant damage to your pipes, while rusty water is dangerous to consume and can contain harmful bacteria that could pose health risks.

The water heater is a large appliance that uses much energy to heat your household water. Maintaining your water heater is important, as well as removing sediment regularly and checking the temperature regularly. If you see rust on the tank or a leaking drain valve, it’s time for a water heater replacement.

If you’re getting lukewarm water, this may indicate that the upper and lower heating elements have gone bad. If you turn off the power to your water heater and remove the access panel, you can check to see if one or both of the heating elements are burned out.

Banging, rattling, or hissing sounds indicate the water heater rusting internally or overheating. A bad heating element will also cause the circuit breaker to trip frequently. A professional plumber can diagnose the problem and repair it as needed.

Over time, minerals can build up in the hot water tank and clog the opening where the drain valve is located. This can lead to poor performance and even complete failure of the drain valve. A professional plumber can flush the tank and remove these mineral deposits to restore proper function.

Depending on the model, a water heater should last between eight and 20 years. If it’s nearing the end of its lifespan, replacing it is often more economical than repairing it.

Keeping up with routine maintenance can help reduce the need for water heater repairs. Turning off the power and draining the water heater twice a year will help keep the unit clean and working properly. This is especially true for gas models, which should be inspected and serviced by a qualified professional every three years to prevent problems. It’s also a good idea to replace the anode rod, or “sacrificial” rod, every three years. It helps prolong the unit’s life by attracting corrosive elements away from the water heater.

Home Improvement

Refinishing Your Hardwood Floor Without Sanding

Unlocking your hardwood floors’ hidden beauty can sometimes involve messy sanding and staining. Some products like Rejuvenate were created to refresh old wood floors without sanding.

Hardwood floors need a top coat of finish, which protects the wood from wear and tear and adds shine. Hardwood Floor Refinishing Bergen County NJ is the process of removing the existing finish layer and then adding a new one.

hardwood floor refinishing

Refinishing is a process that involves using a buffer/sander to remove the topmost layer of finish on your hardwood floors, which exposes the raw wood underneath. This step helps to level out the surface, remove dents and scratches, and restore color. Once this step is complete, the staining and sealing of your floor can begin.

Before sanding, it’s important to sweep the room and vacuum the entire area. This will remove most of the dirt and dust from the room, which will make it much easier to complete this step with less mess. It’s also a good idea to examine the floor for protruding nails, as these can ruin sanding belts or pads. Any loose boards should be nailed down and labeled.

During the sanding process, it’s best to work on one section of the room at a time. Use a 36-grit sandpaper for the first pass, and then move on to a medium grit (60 grit). Once these passes are complete, it’s time for the edge sander to come into play – use this to get into all the nooks and crannies. Finally, a final sanding with fine-grit sandpaper will leave the floor ready for staining.

Once the sanding is complete, you’ll need to vacuum the floor again, this time making sure to get into all the nooks and corners. Then, mop the floor with a damp cloth rag to thoroughly clean it and remove any remaining dust. Finally, let the floor dry completely before resuming regular usage.

Choosing the right stain and sealant is essential to your floors’ durability. Look for stains and varnishes that are low VOC and oil-based to keep your floors in prime condition. The staining process takes a little extra effort, but can be done at home if you follow the proper steps.

It’s also a good idea to do a smell test before applying the first coat of sealant. It’s normal for the first few coats of sealer to have a strong chemical scent, but you don’t want it to be too overpowering. If it is, a second or third coat may be needed.

Staining hardwood floors is a delicate task that requires a good eye for color matching and the ability to manipulate the wood’s grain. If you’re unsure of what color or shade you want, consult with a flooring professional to ensure your hardwood floors will turn out the way you envision them. They will be able to recommend a stain and help you navigate the process with minimal disruption to your home.

To begin the staining process, clear the room of any furniture and rugs. You’ll also want to open windows and use fans to provide adequate ventilation. Once the area is prepped, start in the furthest corner away from the door. This will allow you to work in sections that are long enough that you can walk away without hindering the fresh application.

The best stains for wood floors are oil-based and low VOC (volatile organic compounds). They should have tinting bases that allow you to adjust the color intensity. Hardwood stains should be applied with a rag or applicator pad in the direction of the wood’s grain. It is also important to test the stain in an inconspicuous area of the floor before you begin. You can also choose to water pop your floor before applying the stain, which will open the wood’s pores and allow it to absorb more pigment.

Once you’ve finished the staining process, allow the floor to dry completely before using it. It’s a good idea to wait for a week or so before re-introducing furniture and other items to the space.

After the stain has dried, it’s time to apply a polyurethane sealer. This will protect the floors from moisture damage and scratches, while ensuring that the color doesn’t fade over time. It’s a good idea to do at least three coats of polyurethane.

The final step in the refinishing process is applying a topcoat of polyurethane. This will protect the stained wood from moisture damage and scratching, while ensuring that the color won’t fade over time. You can choose from a wide variety of polyurethane sealers, so consult with your flooring professional to determine what type will be best for your stained wood floors.

Hardwood floors need to be sealed, both to protect them and to create a shiny sheen that is attractive. Sealing also cuts down on maintenance, making it easier to clean and remove dirt from wood. If a client’s hardwood flooring is old and doesn’t have a protective layer, or if it has a worn coating that needs replacing, resealing the wood can help it last for years to come.

Choosing the right type of sealant is important. Some of the options include:

Oil-based polyurethane — this was one of the most popular types of finishes in the past and is still a good choice for commercial settings such as restaurants and bars or homes with children or pets, because it’s very durable. However, it can take a long time to dry, and it releases high levels of VOCs that can linger for weeks.

Water-based polyurethane — this option has become increasingly popular because it dries much faster than oil-based and emits significantly less VOCs. However, it’s not as durable and may not hold up to some water-based stains.

Shellac — this product is a good choice for clients who prefer a glossy finish, but it’s not as durable as other options on the list. It’s also flammable and a little difficult to apply.

It’s important to make sure the hardwood floor is clean before applying a new coat of sealant. Any dirt, dust, or debris that’s stuck to the surface will show through and mar the appearance of the finished product. If the hardwood is particularly dirty, it might need to be sanded again before sealing.

The final step in this process is to apply a second and possibly a third coat of sealant to the wood, waiting several hours between each application. Once the floor is dry, it’s ready to be used again.

When refinishing hardwood floors, it’s important to use the proper equipment and have a large work area. A drum sander is a must for this job, along with a vacuum machine that can handle sawdust and other debris. The work space should be well-ventilated, and it’s a good idea to have family members or pets move out of the room while you refinish the hardwood floors.

Hardwood floors are beautiful on their own, but they don’t stay gorgeous without a coat of protection. Refinishing involves removing the existing layer of finish (using a sanding tool to get down to the bare wood), and then applying a new one. The new coating can be a simple sealant or a more substantial covering, such as polyurethane or varnish. The new coat protects the hardwood from damage and can also enhance its color or grain.

The first step in refinishing hardwood is to remove any furniture from the room you’re working in, and cover any areas you don’t want covered with masking paper or plastic sheets. Next, you’ll need to sand the floor using a large drum sander and proper safety gear. Depending on the current state of your wood, you may need to make multiple passes. After sanding, you’ll need to clean the floors, again using the appropriate cleaning products and safety gear.

When the floors are completely dry, you’re ready to apply the new finish. A water-based finish is best, as it’s more environmentally friendly than an oil-based product. You’ll need to apply a minimum of three coats and wait at least 12 hours between each.

You can also choose to stain your hardwood in addition to applying a sealant. Stains come in a range of colors, and you can choose a color that suits your rooms. When choosing stains, be sure to read the label and check for low-VOC options.

Once the floors have dried, you can replace your furniture and area rugs. Before you do, however, you should check the finish for any flaws or scratches. You can use a hand buffer or a terry cloth mop to touch up the surface, but major gouges or dents are best left for refinishing by a professional.

A high-quality refinishing job can transform your wood floors into something more like their original condition. It’s a project that will require time and patience, so it’s probably not for homeowners who don’t have plenty of space and the energy to tackle it themselves. Choosing the right contractor can ensure your finished result will be exactly what you’re looking for.

Home Improvement

Benefits of Replacement Windows

If you’re dealing with old windows that won’t open, are drafty, or let in too much sunlight, it’s time to replace them. New windows can increase your home’s value, comfort, and resale potential.

Replacement Windows

There are many different window types, styles, and sizes. But which one is best for you? Contact Kelemer Brothers Replacement Windows for professional expertise.

One of the biggest benefits of replacement windows is improved energy efficiency. New windows help to keep heat in during the cold winter months and out during the hot summer months, reducing the load on your HVAC system. This will help to reduce your monthly energy bills and improve the comfort of your home year-round.

Investing in energy efficient windows can have a long-term impact on your energy costs and the environment. By reducing energy consumption, these windows can help to protect the environment by lowering greenhouse gas emissions and preserving natural resources.

Energy efficient windows are designed with a lower U-factor to minimize air transfer, which can significantly reduce your energy bill. This is achieved by using a different type of glass, frame material, spacers, and insulation to create a more effective barrier against heat loss.

By replacing older windows with energy-efficient options, homeowners can save on their electricity and gas bills and see a return on investment in just a couple of years. Upgrading to energy-efficient windows can also increase property value and decrease the time it takes for homes to sell.

Another benefit of energy efficient windows is that they help to reduce noise, creating a more peaceful and comfortable living environment. This can be especially helpful for those who live near busy roads or in loud neighborhoods.

When choosing a company for your window replacement project, be sure to look for quality and reputable brands. A good place to start is by looking at reviews online and checking out a company’s history. If they’ve been around for a while, they’ll likely have a reputation for providing great customer service and high-quality products.

Additionally, it’s important to choose a company that offers a variety of window styles and frame materials. This will ensure that you’re getting the best energy efficient option for your home. For example, Andersen offers over 35 window types with a wide range of operational styles, color options, frame material, and shapes. Their windows are durable and can be customized to fit any home style. They are also Energy Star rated and can help to cut your energy costs.

Increased Home Value

Adding replacement windows is one of the few home improvement projects that provides an immediate increase in a house’s value. It also has a high return on investment and is typically done without breaking the bank, making it a great way to upgrade your home. Moreover, new windows are easy to open, close and clean. They can also make your home more energy efficient and curb appealing.

Homeowners are usually able to recoup 80 percent of their investment. Additionally, replacement windows can add security to your property by providing a tight seal and keeping out unwanted pests. The addition of impact-resistant glass, up-to-date locks and security sensors makes it easier to keep your family safe. Lastly, ENERGY STAR(r) certified windows conserve energy to reduce heating and cooling bills and help you save on your utility costs.

Replacement windows come in a variety of styles to suit almost any architectural design. Some options include casement windows with single-hung or double-hung sashes, bay and bow windows, sliding windows, picture windows, garden windows and more. You can even customize the look with a wide variety of color options, trim and hardware.

There are two kinds of replacement windows, full frame and pocket. In a full frame window the old frame and sashes are removed and replaced with a new window that has an attached frame. Generally, this is used in new construction or to replace older windows with wood frames that are rotting or have a lot of damage.

A pocket replacement window is installed into the existing frame, but does not remove the exterior cladding or trim. Usually, this is a good choice when the original frame is in good shape and only the sashes need replacing.

In general, full frame replacement windows are preferred because they provide better insulation by forming a tight seal against the rough opening. They are also easier to install since they do not require removing the existing sash and interior trim. However, pocket replacement windows are a good option if the existing frame is rot free and strong enough to support the new window.

Increased Comfort

Ugly and drafty windows don’t just detract from your home’s curb appeal; they can also cause your energy bills to skyrocket. But new windows can help keep your home comfortable and reduce your reliance on heating or cooling. Advancements in window frame materials make them more efficient, and their insulated construction helps ensure a consistent indoor temperature without drafts or hot or cold spots.

In addition, many replacement windows offer options that can neutralize harmful UV rays, which can damage and discolor furniture, carpeting and other interior elements. This will prolong the life of your furnishings and increase the overall comfort of your home.

Aside from preventing air leaks, replacement windows can minimize outside noise to create a calm and relaxing atmosphere inside your home. This can help you relax and sleep better at night.

Another way that replacement windows can improve your home’s comfort is by maximizing the amount of natural light that enters your living spaces. This can boost your mood and help you feel more energized throughout the day.

If you’re interested in bringing more natural light into your home, consider double-hung replacement windows with wood or vinyl frames that allow you to open either the bottom or top sash. Or, you may prefer casement or awning windows that open on both sides of the window. These can be operated from a crank or lever. You can also find windows with a projection, such as bay or bow, which are great for letting in more sunlight.

Choosing the best replacement windows depends on the type of window you want and your budget. But you should always consider an experienced, reputable installer for the installation process. This is important because there are dozens of specific tasks that must be completed accurately to ensure the long-term durability of your new windows.

Aside from their heightened energy efficiency, new replacement windows are easier to open, close and clean than old ones. They also add a fresh look to your home and can make it more attractive. If you’re ready to start browsing for new replacement windows, contact the experts at The Replacement Window Company. We can help you select the right window to meet your unique needs and exceed your expectations.

Increased Natural Light

Many homeowners think of replacement windows as a way to upgrade the look and feel of their homes, but they can also help to increase natural light. Studies have shown that people who get a lot of natural light each day are in better moods and sleep better at night by regulating their circadian rhythms. This is because the sun naturally releases mood-boosting vitamin D which can help make you feel more energized.

In fact, many of today’s windows are designed with larger panes of glass and slimmer frames to maximize daylight. Additionally, many new windows do not have grilles which block natural light, so you can enjoy a brighter home.

If you tune into any home improvement show, you will notice that homeowners want open floor plans and natural lighting to make their homes feel more spacious and inviting. And although you may not be ready to sell your home, if you ever decide to put it on the market, you will find that new replacement windows are a great selling point because they offer such an attractive return on investment for buyers.

Not only do new replacement windows increase the value of your home, they can also save you money on energy bills. By letting in more sunlight, you can reduce your reliance on artificial lighting during the day, saving money on electricity costs all year round.

In addition, sunlight coming into your home through your new replacement windows can add warmth during the winter and reduce air conditioning usage in the summer. This means you’ll spend less on energy during the colder months and have more money to invest in home improvements down the road.

If you are considering upgrading your home with replacement windows, be sure to work with a reputable company that has been around for a long time. This will give you peace of mind that they have the experience and expertise to manufacture quality products and provide supportive customer service. You can check the company’s reputation by searching online or reading trade magazines. You can also ask friends and family members for recommendations.