Unlocking your hardwood floors’ hidden beauty can sometimes involve messy sanding and staining. Some products like Rejuvenate were created to refresh old wood floors without sanding.
Hardwood floors need a top coat of finish, which protects the wood from wear and tear and adds shine. Hardwood Floor Refinishing Bergen County NJ is the process of removing the existing finish layer and then adding a new one.
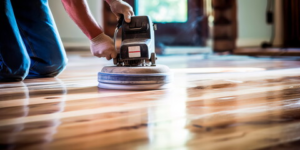
Refinishing is a process that involves using a buffer/sander to remove the topmost layer of finish on your hardwood floors, which exposes the raw wood underneath. This step helps to level out the surface, remove dents and scratches, and restore color. Once this step is complete, the staining and sealing of your floor can begin.
Before sanding, it’s important to sweep the room and vacuum the entire area. This will remove most of the dirt and dust from the room, which will make it much easier to complete this step with less mess. It’s also a good idea to examine the floor for protruding nails, as these can ruin sanding belts or pads. Any loose boards should be nailed down and labeled.
During the sanding process, it’s best to work on one section of the room at a time. Use a 36-grit sandpaper for the first pass, and then move on to a medium grit (60 grit). Once these passes are complete, it’s time for the edge sander to come into play – use this to get into all the nooks and crannies. Finally, a final sanding with fine-grit sandpaper will leave the floor ready for staining.
Once the sanding is complete, you’ll need to vacuum the floor again, this time making sure to get into all the nooks and corners. Then, mop the floor with a damp cloth rag to thoroughly clean it and remove any remaining dust. Finally, let the floor dry completely before resuming regular usage.
Choosing the right stain and sealant is essential to your floors’ durability. Look for stains and varnishes that are low VOC and oil-based to keep your floors in prime condition. The staining process takes a little extra effort, but can be done at home if you follow the proper steps.
It’s also a good idea to do a smell test before applying the first coat of sealant. It’s normal for the first few coats of sealer to have a strong chemical scent, but you don’t want it to be too overpowering. If it is, a second or third coat may be needed.
Staining hardwood floors is a delicate task that requires a good eye for color matching and the ability to manipulate the wood’s grain. If you’re unsure of what color or shade you want, consult with a flooring professional to ensure your hardwood floors will turn out the way you envision them. They will be able to recommend a stain and help you navigate the process with minimal disruption to your home.
To begin the staining process, clear the room of any furniture and rugs. You’ll also want to open windows and use fans to provide adequate ventilation. Once the area is prepped, start in the furthest corner away from the door. This will allow you to work in sections that are long enough that you can walk away without hindering the fresh application.
The best stains for wood floors are oil-based and low VOC (volatile organic compounds). They should have tinting bases that allow you to adjust the color intensity. Hardwood stains should be applied with a rag or applicator pad in the direction of the wood’s grain. It is also important to test the stain in an inconspicuous area of the floor before you begin. You can also choose to water pop your floor before applying the stain, which will open the wood’s pores and allow it to absorb more pigment.
Once you’ve finished the staining process, allow the floor to dry completely before using it. It’s a good idea to wait for a week or so before re-introducing furniture and other items to the space.
After the stain has dried, it’s time to apply a polyurethane sealer. This will protect the floors from moisture damage and scratches, while ensuring that the color doesn’t fade over time. It’s a good idea to do at least three coats of polyurethane.
The final step in the refinishing process is applying a topcoat of polyurethane. This will protect the stained wood from moisture damage and scratching, while ensuring that the color won’t fade over time. You can choose from a wide variety of polyurethane sealers, so consult with your flooring professional to determine what type will be best for your stained wood floors.
Hardwood floors need to be sealed, both to protect them and to create a shiny sheen that is attractive. Sealing also cuts down on maintenance, making it easier to clean and remove dirt from wood. If a client’s hardwood flooring is old and doesn’t have a protective layer, or if it has a worn coating that needs replacing, resealing the wood can help it last for years to come.
Choosing the right type of sealant is important. Some of the options include:
Oil-based polyurethane — this was one of the most popular types of finishes in the past and is still a good choice for commercial settings such as restaurants and bars or homes with children or pets, because it’s very durable. However, it can take a long time to dry, and it releases high levels of VOCs that can linger for weeks.
Water-based polyurethane — this option has become increasingly popular because it dries much faster than oil-based and emits significantly less VOCs. However, it’s not as durable and may not hold up to some water-based stains.
Shellac — this product is a good choice for clients who prefer a glossy finish, but it’s not as durable as other options on the list. It’s also flammable and a little difficult to apply.
It’s important to make sure the hardwood floor is clean before applying a new coat of sealant. Any dirt, dust, or debris that’s stuck to the surface will show through and mar the appearance of the finished product. If the hardwood is particularly dirty, it might need to be sanded again before sealing.
The final step in this process is to apply a second and possibly a third coat of sealant to the wood, waiting several hours between each application. Once the floor is dry, it’s ready to be used again.
When refinishing hardwood floors, it’s important to use the proper equipment and have a large work area. A drum sander is a must for this job, along with a vacuum machine that can handle sawdust and other debris. The work space should be well-ventilated, and it’s a good idea to have family members or pets move out of the room while you refinish the hardwood floors.
Hardwood floors are beautiful on their own, but they don’t stay gorgeous without a coat of protection. Refinishing involves removing the existing layer of finish (using a sanding tool to get down to the bare wood), and then applying a new one. The new coating can be a simple sealant or a more substantial covering, such as polyurethane or varnish. The new coat protects the hardwood from damage and can also enhance its color or grain.
The first step in refinishing hardwood is to remove any furniture from the room you’re working in, and cover any areas you don’t want covered with masking paper or plastic sheets. Next, you’ll need to sand the floor using a large drum sander and proper safety gear. Depending on the current state of your wood, you may need to make multiple passes. After sanding, you’ll need to clean the floors, again using the appropriate cleaning products and safety gear.
When the floors are completely dry, you’re ready to apply the new finish. A water-based finish is best, as it’s more environmentally friendly than an oil-based product. You’ll need to apply a minimum of three coats and wait at least 12 hours between each.
You can also choose to stain your hardwood in addition to applying a sealant. Stains come in a range of colors, and you can choose a color that suits your rooms. When choosing stains, be sure to read the label and check for low-VOC options.
Once the floors have dried, you can replace your furniture and area rugs. Before you do, however, you should check the finish for any flaws or scratches. You can use a hand buffer or a terry cloth mop to touch up the surface, but major gouges or dents are best left for refinishing by a professional.
A high-quality refinishing job can transform your wood floors into something more like their original condition. It’s a project that will require time and patience, so it’s probably not for homeowners who don’t have plenty of space and the energy to tackle it themselves. Choosing the right contractor can ensure your finished result will be exactly what you’re looking for.