Water Damage Restoration

Water Damage Restoration for Basements and Crawl Spaces

Salt Lake City Water Damage Restoration

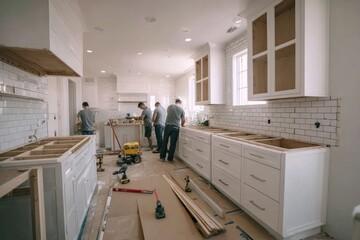
Basement and crawl space flooding is a serious problem that leads to structural damage, unpleasant odors, and health concerns. The best way to prevent it is through effective waterproofing strategies.

Salt Lake City Water Damage Restoration uses external waterproofing methods like grading and French drains that direct groundwater away from the home, reducing hydrostatic pressure. Internal waterproofing includes vapor barriers and dehumidification, which lock out moisture and improve air quality.

Gaps

Many of the same issues that cause water damage in basements can also affect crawl spaces. However, the problems can be more hidden and difficult to detect. When unchecked, they can lead to mold growth, sagging floors and foundation cracks, pest infestations and other structural problems throughout the house.

Moisture intrusion is one of the most common causes of crawl space water damage. It can be caused by heavy rainfall pooling around the home’s foundation, plumbing leaks, groundwater flooding or vapor rising through the soil naturally. Left unchecked, this moisture spreads through the crawl space and into living areas above.

The resulting moisture can contribute to wood rot, a process that often causes foundation issues. If this isn’t dealt with, a crawl space may eventually sag and support beams will degrade, which could potentially collapse the entire structure. Signs of wood rot include sagging or bouncy floor and walls, gaps between baseboards and flooring and rotting drywall.

A wet crawl space can also attract rodents and termites. Rodents can chew wires and insulation, causing electrical issues, and termites may damage the wood elements of your home, leading to expensive repairs. A wet crawl space can also create a welcoming environment for insects that can enter your home, including spiders and flies.

Crawl space waterproofing and drainage solutions are crucial to protecting this hidden area of your home. Adding a sump pump to your crawl space can help control moisture and ensure water is pumped away from the house during storms or high water table periods. In addition, a French drainage system is an excellent way to redirect water away from your foundation and into the surrounding soil, helping prevent future issues.

Detecting and addressing the hidden issues in your crawl space can have major benefits for your home. For example, a clean and dry crawl space can improve the air quality in your home and lower energy costs. It can also be a selling point for potential buyers, as a well-maintained crawl space can protect against serious structural and health issues. For more information, contact Zavza Seal LLC today to schedule an inspection and a free estimate.

White Stains

Basement wall stains are a visual warning sign that the integrity of your foundation and walls may be at risk. These white or red stains are actually caused by the chemical process known as spalling, which is when the salts within the concrete break apart and dissolve in water that seeps through the walls. Over time, the resulting minerals build up and the stains appear. These stains are often seen in unfinished basements, which lack the waterproofing typically applied during new home construction. But even finished basements can experience problems, because the backfill soil and rocks that fill the space around the foundation will eventually wear away, allowing groundwater to saturate and stain the basement walls.

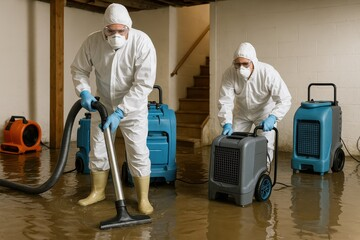
The first step in any basement or crawl space restoration project involves water extraction. High-powered pumps and vacuums remove as much water as possible from the affected area, slowing the damage that can occur to flooring and furnishings. After the water is removed, industrial fans and dehumidifiers are used to dry out the space and prevent mold growth. Once the area is dry, any damaged or contaminated materials are removed and the space is monitored and inspected for moisture.

Water in a crawl space can lead to serious structural issues for the entire home, including weakened support beams and wooden floor joists that can warp or rot. It can also promote the growth of mold, which is dangerous to the health of occupants. Standing water in a crawl space can be caused by roof drainage problems, overflowing gutters and sagging crawl space floors. It can also be introduced by plumbing leaks, plumbing repairs or burst pipes.

Addressing the source of the problem is critical for preventing future flooding. Exterior drainage solutions, like installing a French drain or a sump pump system, can help to redirect rainwater and prevent it from seeping into the crawl space or basement. It’s also a good idea to install clean gutters and extend them downspouts to divert rainwater away from the house and prevent it from flowing over foundation walls, which can create water damage. Other waterproofing solutions for crawl spaces and basements include encapsulation, which seals the space with a thick vapor barrier that locks out moisture, improves indoor air quality and can prepare the space for other upgrades.

Mold

Mold in crawl spaces and basements is more common than you might think. This type of fungus loves damp, dark places with poor airflow like crawl spaces and basements. As it grows, it eats away at wood beams and joists. This can cause sagging floors, musty odors, and structural damage over time.

Mold is a health risk as well, especially for those with allergies or breathing issues. It releases spores into the air that can trigger sneezing, itchy eyes and nose, and other allergy symptoms. Mold spores also travel through your home’s ventilation system, making them more prevalent throughout the house.

The moisture that causes mold in crawl spaces and basements is usually due to plumbing leaks or foundation cracks. The problem may also be caused by clogged gutters or downspouts, soil that slopes toward the home, and poorly-designed drainage systems. The best way to prevent these problems from causing mold is by having the area properly repaired and sealed.

Moisture in crawl spaces can also wreak havoc on the wooden supports under your house. Not only does it rot the wood and create sagging floors, but it can cause foundation cracking over time and lead to serious structural problems.

If you have a crawl space, it is crucial to regularly inspect it for water damage and signs of mold. If you see any of these problems, get a professional inspection right away.

A qualified inspector can find the source of the problem and make repairs to prevent future flooding and rot. They can also install a sump pump and ensure that your gutters and drains are functioning properly. They can also seal any foundation cracks that are allowing water into your crawl space or basement. This prevents long-term moisture and mold problems and keeps your home healthier and safer for your family.

Efflorescence

Efflorescence is a white chalky residue on the surface of concrete, brick and other porous building materials. It’s a clear indicator of moisture problems, and should never be ignored. Efflorescence isn’t dangerous, but it can lead to mold and mildew growth, structural damage and indoor air quality issues.

It’s important to understand how this problem develops so homeowners can identify it and take corrective action quickly. According to the International Association of Certified Home Inspectors, porous building materials can absorb and wick water over a six-mile radius, transporting soluble salts along the way in a similar manner as a tree carries water through its roots up to its leaves. Because of this, when these materials are exposed to water, the soluble salts infiltrate the interior and eventually rise to the surface.

The white, powdery substance on basement walls is called efflorescence, and it indicates moisture problems. Typically found on concrete, brick and stone, it’s caused when water penetrates the wall through leaks or cracks and brings water-soluble salts to the surface. As the water evaporates, it leaves behind these crystalline deposits of salt and minerals.

Often, the salts that cause efflorescence are calcium carbonate or sodium chloride, which are naturally occurring in building materials and in the soil around them. They’re also commonly found in areas prone to water infiltration, such as basements or crawl spaces.

Basements and crawl spaces are particularly susceptible to water damage because they’re below ground level and often in contact with groundwater. As a result, they’re often subject to flooding and water infiltration through foundation cracks or walls. Water infiltration can lead to mold growth, deterioration of wood and metal and, in severe cases, structural damage.

A slew of solutions can help prevent and address these problems, including waterproofing, sump pump installation, French drain installation, foundation crack repair, dehumidification, mold remediation and more. The best approach is a comprehensive one that combines these services with an exterior drainage system that redirects water away from the home and basements. In addition, a specialized basement dehumidifier helps reduce humidity levels and maintain a dry, usable space.

General Contractors

Kitchen Remodeling Timeline – What to Expect

Kitchen Remodeling Lexington KY

The kitchen remodel timeline is one of the most important questions homeowners ask. After all, living without a functional kitchen and eating takeout for weeks wears on everyone.

Kitchen Remodeling Lexington KY renovation includes a full demolition and new layout typically takes about six months. But unexpected issues and backorders can extend the schedule.

Design

During the design phase, kitchen remodelers plan for materials, layout, and functionality. Depending on the project, this may involve a significant amount of creativity and problem-solving, especially when it comes to moving plumbing. Unless your house is on a slab, you will likely have to reroute water supply and drain lines for appliances, sinks, dishwashers, and refrigerators that are being moved to different locations in the kitchen.

If you want to keep your cabinets, countertops, and appliances in the same places but change the layout, consider a “pull-and-replace” renovation. This option includes new cabinetry, upgraded flooring, and state-of-the-art appliances.

You can also transform your kitchen into a smart home with new automation systems. Integrated technology like voice-activated lighting, app-controlled appliances, and touchless faucets can make cooking more fun and convenient. This type of kitchen remodeling often adds value to your home and can be a selling point for prospective buyers.

Other popular options for modernizing kitchens include adding islands, changing up the flooring, and swapping out light fixtures. In many cases, a minor or cosmetic upgrade will have the same effect as a full kitchen remodel but at a more affordable price.

A complete kitchen remodel usually involves structural changes, relocating load-bearing walls, and changing the overall floor plan. It’s ideal for homeowners who need more space and a bigger transformation, or those who want to improve their kitchen’s resale value.

While a remodel can be expensive, it’s important to set a realistic budget and stick to it. Overestimating the scope of work or selecting premium materials can cause your budget to balloon. It’s also common for unexpected issues to arise during the remodeling process, which can delay or extend the timeline. Having a contingency fund for these expenses will help avoid financial strain and protect you from overspending.

During this stage, it’s also crucial to select durable, energy-efficient materials and appliances. This will reduce your home’s environmental footprint and save you money on utilities in the long run. A professional kitchen designer can guide you through a range of options that meet your needs and fit your budget.

Rough Construction

Whether you’re channeling your inner HGTV star or quietly watching the pros rip things down, demolition day is loud, dusty, and oddly satisfying. The kitchen’s old stuff goes away, and the skeleton of your dream space begins to take shape. Before the first nail gets hammered, however, your team will prep the workspace, sealing off the rest of your home with plastic sheeting and dust control measures (because drywall dust has a habit of finding its way into every sock drawer).

Once the framing starts, walls are built, doorways get moved, and your kitchen really takes shape. If your remodel involves opening up exterior walls or moving plumbing, permits are a must, and this can sometimes slow things down. It’s also important to remember that weather can play a role in this stage—a stormy day might delay progress, especially if outdoor work is involved.

This is the time when lighting becomes a top priority, as pendants go up over the countertops and wall sconces appear in unexpected places. Choosing the right lights will not only help you see your food better, but it can set a mood for the entire room. Think about the lighting in your friends’ kitchens—do they have a warm, cozy feel or are they more stark and minimalist?

Countertops get templated, and finally your dream slab of quartz or marble comes into place. This is when your new kitchen truly feels like a finished product, and it’s a good idea to choose durable materials that can stand up to heavy foot traffic.

Back-orders and long lead times are a reality of kitchen remodeling, particularly with custom cabinets and made-to-order stone and tile. It’s important to consider these potential delays ahead of time, and to make sure you have a cushion in your budget for any surprises.

This is the point where your final walkthrough with your contractor happens, and any punch list items are taken care of. It’s a good opportunity to double-check that the outlets are working, the cabinets open correctly, and that there’s no stray paint chip or ding in sight.

Finish Construction

The final construction stage transforms your kitchen from a construction zone to a functional space. This phase includes installing appliances, countertops and any other finishes. It also includes plumbing and electrical work. Many homeowners find this to be the most time consuming part of the project, especially when materials are backordered or require off site fabrication. This can cause significant delays and affect the overall remodel timeline. To avoid this, make sure to order your materials as early as possible and choose in stock items whenever possible.

This is also the time to install new flooring and paint the walls. Ordering these items 4-6 weeks before starting construction will help minimize storage needs and reduce the risk of damage during the remodeling process. If you’re unsure of what finishes to select, ask for samples and give yourself plenty of time to review in natural light before ordering.

It’s also the time to apply for any required building permits. This step can take weeks or even months depending on your municipality, so it’s important to budget accordingly and plan ahead.

If your remodel requires demolition, it’s important to prepare and protect the rest of your home. Proper preparation prevents damage and ensures safety for everyone during the process. It’s also the best way to save money by eliminating unnecessary expenses, such as repairs or replacement costs.

Once the rough construction is complete, it’s time to move in. This can be a very hectic and stressful time, so it’s important to be prepared for the chaos. It’s a good idea to plan out meals ahead of time (takeout will become your friend) and find ways to escape the construction zone when possible.

Kitchen renovations require careful planning and sequencing to ensure quality workmanship and code compliance. Understanding the kitchen remodeling process and scheduling each phase ahead of time helps you avoid costly mistakes that can derail your project’s timeline and budget. The key to success is hiring a trusted kitchen remodeler that will manage every step of the project and provide clear communication. With a well-planned and organized remodel, you can achieve the kitchen of your dreams!

Installation

The kitchen remodeling process can feel overwhelming for homeowners. But preparing ahead of time helps to minimize frustrations and delays, especially during the construction phase. To make the experience as stress-free as possible, it’s essential to have a clear plan and communication with your contractor from the start. Having expectations clearly defined and a regular day to check in can also reduce the risk of unexpected changes and expenses.

A successful kitchen remodel requires the right mix of planning, persistence and flexibility. As you work with your team, it’s important to keep in mind that the process isn’t a linear progression, but rather an interconnected series of steps that ultimately lead to your dream kitchen.

Whether you’re remodeling an existing kitchen or starting from scratch, the first step is to create a detailed kitchen layout. This will help guide your decisions and ensure that the final results are consistent with your goals.

This design phase involves evaluating the space, determining how you use the kitchen and selecting products that are functional for your lifestyle. This includes determining what electrical, plumbing and gas work will be needed to accommodate your new appliances. It’s also a good idea to consider countertop cutouts, cabinets, lighting and backsplash. Lastly, if you’re considering built-in appliances, such as a dishwasher or range hood, you may need to take into account the size of your refrigerator and other cabinetry to ensure proper installation.

Once you have a comprehensive kitchen design, it’s time to get started with the demolition and construction. This phase is usually the longest of the entire project. In order to minimize disruptions, you’ll want to make a plan for cooking and eating elsewhere while construction takes place. To avoid losing track of kitchen equipment, you should label and store small appliances, cookware, dishes and utensils in storage containers, bags or low-sided boxes. You’ll also want to remove any hanging decorations or items from adjacent rooms that could be damaged by dust and debris. This will save you time and effort when it comes to re-hanging items once the kitchen is complete.